|
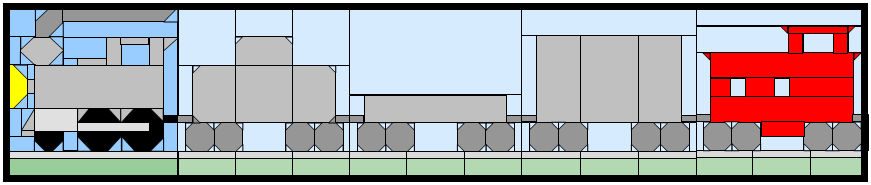
Chiloquilters Block of the Month Train Quilt Block Six, Steamer |

|
Steamer Block Printed with permission ©Copyright 2003 Chiloquilters |
|
Here we go again, another bunch of little pieces that all need to be sewn together. Well let’s get with it.
Strip One starts by sewing SM1 and the SC pieces together using the illustrated technique we’ve used for the wheels (see below) then SM2 and the SC piece then sew S2 to SM2. Now start with S1 and sew to SM1, then to SM2 to complete Strip One.
Strip Two is similar, start with E1 and it’s SC pieces, then S5 to E2 and those to S4. Next is E2 to S6. To build the strip take The first S3 sew to E1, then take that and sew to S4, and to the next S3, then to S6, and then to the last E3. This completes Strip Two.
Strip Three has the SC pieces being sewn to the L1 piece. Sew the S8 pieces to the E4 piece. Now build the strip by sewing L1 to E4 to E5 and that’s done.
Strip Four looks tough but it’s just more of those nice little corners to play with. Let’s start by sewing SC2 and E6 together, and please notice that these are sewn at a different angle, measure in 1/4 inch from the upper right hand corner and from the bottom left hand corner. Draw a line connecting these points. This is the angle for this seam. Next sew the SC3 pieces to W1, then the EC and the SC pieces to both of the W2’s. To start building the strip let’s add the E4 to the E6, sew the S3 to the E6, then sew the bottom S3 to that combination. Next sew the W1 to the S9 and both of those to the P1. Sew the first combination to the P1 set then sew that to the first W2, followed by the last W2. Don’t do anything with P2 yet.
Strip Five is the easiest (Yeah!), just sew R1 to G1. This completes the last strip.
The last piecing to do is to sew EC to the top edge of S7, then S7 to C1 then C1 to S3.
To complete the block sew the top of Strip Four to the bottom of Three (align on the left edge of each strip), next comes the top of Three to the bottom of Two. With these three strips sewn together we can now sew on the side strip S7 to the right hand edge of the assembly. When done sew the top of Strip Five to the bottom of the assembled strips. Lastly sew the bottom of Strip One to the top of the assembly. That ‘should’ complete the block. Well done! |
|
Cutting Instructions Note: These sizes include the 1/4” seam allowance. |

|
Items listed in blue are corrections to previous postings |
|
Piece |
Quantity |
Cut |
Finished |
|
|
|
|
Size |
Size |
Use |
|
C1 |
1 piece dark |
1 x 1 1/2 |
1/2 x 1 |
(coupler) |
|
E1 |
1 piece engine |
2 1/2 x 3 1/2 |
2 x 3 |
(stack) |
|
E2 |
2 pieces engine |
1 x 2 1/2 |
1/2 x 2 |
|
|
E3 |
2 pieces engine |
1 1/2 x 2 1/2 |
1 x 2 |
|
|
E4 |
2 pieces engine |
1 x 1 1/2 |
1/2 x 1 |
|
|
E5 |
1 piece engine |
3 1/2 x 9 1/2 |
3 x 9 |
(engine) |
|
E6 |
1 piece engine |
2 x 1 1/2 |
1 1/2 x 1 |
(pilot) |
|
EC |
5 pieces engine |
1 1/2 x 1 1/2 |
1 x 1 |
(corners) |
|
G1 |
1 piece earth/ground |
2 x 12 1/2 |
1 1/2 x 12 |
(ground) |
|
L1 |
1 piece light (yellow) |
2 x 3 1/2 |
1 1/2 x 3 |
(light) |
|
P1 |
1 piece light grey |
2 x 3 1/2 |
1 1/2 x 3 |
(cylinder) |
|
P2 |
1 piece light grey |
1 x 5 1/2 |
1/2 x 5 |
(side rod) |
|
R1 |
1 piece light grey |
1 x 12 1/2 |
1/2 x 12 |
(track) |
|
S1 |
1 piece sky |
2 1/2 x 2 1/2 |
2 x 2 |
|
|
S2 |
1 piece sky |
1 1/2 x 8 1/2 |
1 x 8 |
|
|
Piece |
Quantity |
Cut |
Finished |
|
|
|
|
Size |
Size |
Use |
|
S3 |
4 pieces sky |
1 1/2 x 2 1/2 |
1 x 2 |
|
|
S4 |
1 piece sky |
2 x 3 1/2 |
1 1/2 x 3 |
|
|
S5 |
1 piece sky |
1 x 1 1/2 |
1/2 x 1 |
|
|
S6 |
1 piece sky |
2 x 2 1/2 |
1 1/2 x 2 |
|
|
S7 |
1 piece sky |
6 x 1 1/2 |
5 1/2 x 1 |
|
|
S8 |
2 pieces sky |
1 1/2 x 1 |
1 x 1/2 |
|
|
S9 |
1 piece sky |
2 x 1 1/2 |
1 1/2 x 1 |
|
|
SC |
9 pieces sky |
1 1/2 x 1 1/2 |
1 x 1 |
(corners) |
|
SC2 |
1 piece sky |
2 x 1 1/2 |
1 1/2 x 1 |
|
|
SC3 |
6 pieces sky |
1 x 1/2 |
1/2 x 1/2 |
|
|
SM1 |
1 piece smoke |
2 1/2 x 2 1/2 |
2 x 2 |
|
|
SM2 |
1 piece smoke |
1 1/2 x 8 1/2 |
1 x 8 |
|
|
W1 |
1 piece dark |
2 x 2 1/2 |
1 1/2 x 2 |
(wheel) |
|
W2 |
2 pieces dark |
3 1/2 x 3 1/2 |
3 x 3 |
(drivers) |