|
These are the instructions for the third Block of the Month Train Quilt Block. The instructions will be kept simple and lots of the details will be left up to you. The color selections are completely yours but we will make some suggestions where appropriate. Remember to make two, one for you and one for you to send to Train Mountain for the Train Mountain wall quilt. Here goes.
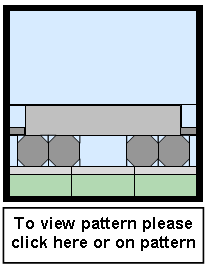
If you made last month’s block you will see this months block is even easier. It still has the same Strip Three and Four. But the rest is easier. Notice also that there is an optional way to do the center portion of the block so it can either be a Gondola or a Flat Car.
The Flat Car and the Gondola are two of the those neat rail cars where you can actually see what’s on or in the rail car. Use your imagination and pile on the goodies. Think about all those fun ‘loads’ that you can appliqué for a ‘load’. Let’s see there is lumber, tractors, boats, animals, ‘stuff’, all kinds of things can be put in or on these rail cars. Remember that the railroad has lot’s of these kinds of rail cars too!
Strip One is easy to build this month, just cut it out! For the Gondola cut out S1a for the Flat Car cut out S1b. .
Strip Two can be built two ways, to build a Gondola: C1 sewn to S2, C1/S2 sewn to B2a, repeat these steps to complete the right hand end and sew to complete strip two. Optionally to build a Flat Car: C1 sewn to B2b, repeat to complete the right hand end to complete strip two
Strip Three is built by making the W1 wheels the same as last month (see figures below), then sewing S3 to the completed W1, add the next W1, sew to S4, complete the right hand end and sew to complete strip three. |
|
Strip Four is built by sewing G1 to E1. Note: Strips Three and Four will be repeated in most of the remaining blocks for the Train Quilt.
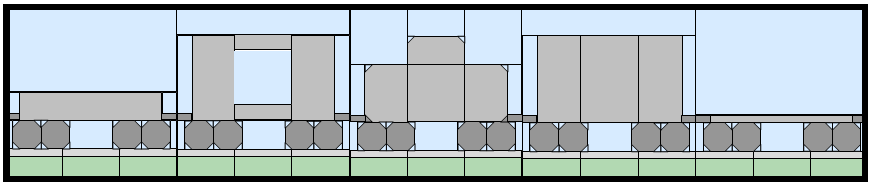
To complete the block sew the bottom of Strip One to the top of Strip Two, the bottom of Strip Two to the top of Strip Three (special note: these seams won’t line up for Strips Two and Three as the rectangles are all different sizes), and finally the bottom of Strip Three to the top of Strip Four. Block Three complete! Remember though that there can be more than one Gondola or Flat car in each train in the quilt.
Start thinking about the finished size of your quilt as that will determine how many of the blocks you will need. As an example a 6 x 7 block quilt will require 42 of these blocks to complete the quilt. We will have dimensions for the more popular size quilts in future issues. |
|
Chiloquilters Block of the Month Train Quilt Block Three, Gondola or Flat Car |
|
A special note from your editor, Linda and I are writing the instructions for these blocks and any and all criticism is greatly appreciated. If you have a different way or a better way or have any kind of a question regarding this quilt, please drop us a line: Train Quilt, P.O. Box 927, Chiloquin, OR 97624 or linda@hobby-tronics.com |

|
Gondola/Flat Car Block Copyright 2002 Printed with permission From Chiloquilters |
|
S1a—1 piece sky material 5 1/2 x 12 1/2 or S1b—1 piece sky material 7 1/2 x 12 1/2 S2—2 pieces sky material 1 1/2 x 6 (optional) S3—2 pieces sky material 1 x 2 1/2. S4—1 pieces sky material 3 1/2 x 2 1/2. SC—16 pieces sky material 1 x 1 (corners) |
|
Cutting Instructions |
|
B1a—1 piece gondola material 3 1/2 x 10 1/2 or B1b—1 pieces flat car material 1 x 10 1/2. C1—2 pieces dark material 1 1/2 x 1 (couplers) G1—1 piece light gray material 1 x 12 1/2 (track) E1—1 piece earth colors material 2 x 12 1/2 (earth) W1—4 pieces dark material 2 1/2 x 2 1/2 (wheels) |